Introduction
I’m going to talk a bit about visual programming and how I’d like to see it done. Be warned, this post reads like one of those start-up pitches from a business student.
Grouping & Infinite Canvas
Flowcharts are a natural and intuitive way of representing logic. It’s how some existing visual programming environments such as the Illumination Software Creator go about it, and it’s how I’d approach the subject as well.
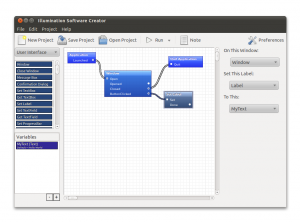
The big limitation of doing things this way has to do with complexity. Say each block of the flowchart represents an action. With only a few blocks on display, the program’s logic is immediately clear. But start to tack on block after block, and that flowchart becomes an opaque mess.
The way I would overcome this is to allow groups to be grouped together on an infinite canvas. I’ve done a quick mockup to illustrate what I mean, shown below.
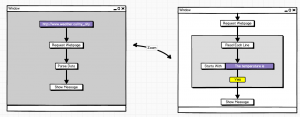
On the left is a flow chart representing a program that retrieves the current weather for my city and then displays it for me. First it loads the data from a web page, then it parses the contents of that page for the relevant information, before finally displaying it.
The parsing stage is a bit more involved than what’s presented, but those details aren’t relevant to the big picture. So the boxes that would make up that more intricate logic are grouped together in a single box labeled “Parse Data.” Zoom in, and the logic that makes up that step is revealed. You could keep siphoning portions of logic away like this, always making sure that what the program does is clear, while the mechanics of how it functions is hidden until needed.
Only Show the Minimum
Many existing visual programming environments tend to show every possible action with one of the blocks. Take the following screenshot for Apple’s Quartz Composer.
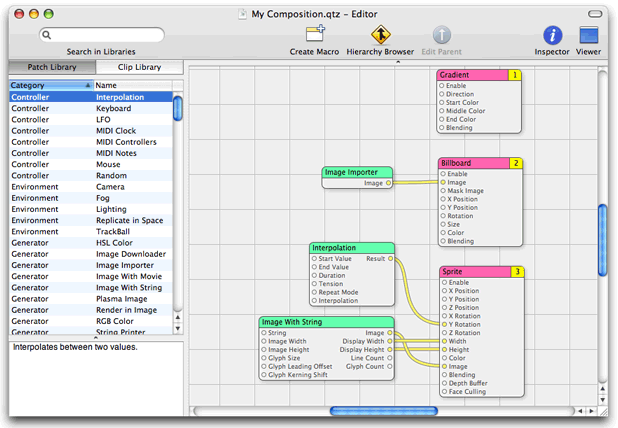
In this image, you can see that all the possible ways to interface with each block is stipulated. While this is practical while programming, it undermines the clarity afforded by using flowcharts. You end up with a bunch of text on display that are entirely irrelevant to the final workings of the project. So I would only present these options when explicitly desired, by way of a radial menu that pops up when the mouse approaches a block. Otherwise, they’re hidden away.
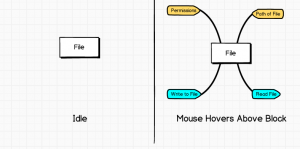
The blocks that appear would be shaped to indicate whether they’re inputs, or outputs.
High Level for Modern Times
I argue that high-level languages aren’t so high-level anymore. Yes they are more abstract than their antecedents, but the problems they’ve been asked to solve get more and more complex while the languages and their standard libraries remain frozen in the time of their inception. The end result is that the amount of boiler plate code programmers need to write goes up as the language gets older, less they embrace third-party libraries.
I’d move up the bar of what high level is. Software developers would no be required to explicitly open and close files – when they’d want to write to a file, they would just put a block symbolizing the file to write to. For HTTP requests, it would be as simple as specifying a URL to send/receive from. Cut down the boiler plate code.
Likewise, don’t burden the programmer with types. Think about all ways we can store numbers: a two byte integer, a four byte integer, an unsigned integer, a single or double precision floating point number, a complex number, something like BigNum, etc. There’s very good reasons why these types exist, but in most cases, which one is the right one could be determined automatically at run-time. So this language would be a dynamically and loosely/weakly typed. The only thing that would matter is if there’s one of it, or many of it (see below.)
Embrace Concurrency & Parallelism
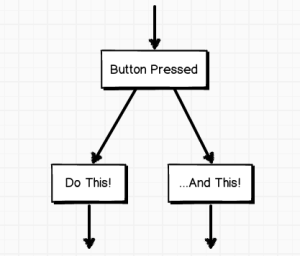
The flowchart model lends itself well to concurrent programming, where you have multiple logic trees being executed simultaneously. With traditional programming languages, you’d have to set-up threads for each piece of code you wanted to run at the same time. With visual programming languages, it’s as easy as having “two arrows coming out of your block.”
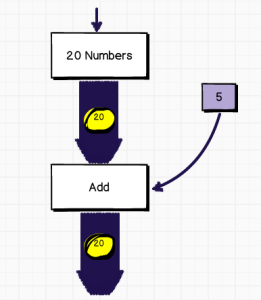
Earlier I said that variables would be typeless, and that the only distinction would be whether there was one of it, or many of it. By keeping track of whether there’s many of it, we open the doors to easy parallelism. Thin arrows between blocks indicate “one of it”, and thick arrows mean “many of it.” Applied to a block that adds a number to an input, you could have the computer do calculations in parallel. Each item in the “many of it” could itself be an array, opening up the doors to multi-dimensional datasets.
Event-Driven from the Get Go
Any application that reacts to asynchronous I/O events relies on executing code following an event. It can be as simple as an infinite while loop, but it’s there. That’s almost every single modern application out there. Yet we always start from a baseline where that isn’t the case, and we have to put in an event loop ourselves or whatnot.
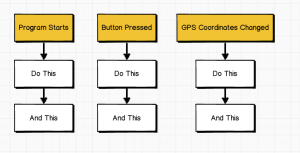
Many visual programming languages are already event-driven. This one would be too.
The Best of All Languages
For this theoretical programming environment to gain traction, it has to be useful. Yet it’ll be anything but if only supports a handful of use cases on launch. So to give it any chance of widespread adoption, you have to ride on the success of others.
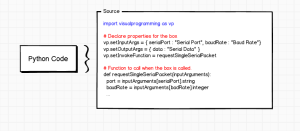
In other words, allow people to easily integrate code written in something like Python. That way if there’s no blocks to do what they want, they can invoke a “Python” block where they can call libraries that let them perform the specialized task.
Built-In Revision Control
To my knowledge, no visual programming environment has built-in revision control. And current text-file oriented systems are entirely inadequate to show how one revision in a visual environment differs from another. So I’d integrate revision control into the programming environment.
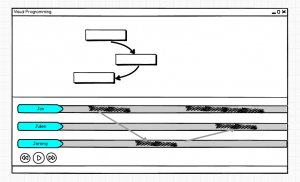
I envision it as something where you can slide back and forth between commits, and see how the the contents of the canvas morph. Animations would show blocks move if they did, or pop in with a visual cue if they were added. You could see the changes by branch or by user.
Integrated Debugging & Profiling
If your program didn’t behave as expected, you would be able to execute the code in steps, block by block. The arrows in between blocks would animate as data travelled from one to another. Or you could set breakpoints where the program pauses when it reaches a specific point. The data passing through any arrow could easily be exposed.

Mouse or Finger, Will Travel
This software needs to be an experience that works as well with touch-only interfaces as with those systems that have a mouse and keyboard. It cannot feel like “it’s made” for the other input device. Sure, it’ll embrace the information-spartan paradigm common to mobile applications, but that doesn’t mean it has to be any less pleasant to use with the good old mouse.
So what does that mean? For fingers, pinch and drag will zoom, while for the mouse, it will be achieved by the scrollwheel. To select multiple blocks, the mouse might click and drag, while fingers might swipe around the objects. Right-clicks will still deliver contextual menus, and so forth.
Yep, Looks *ARE* Important
There’s a train of thought that places general appearance as a secondary consideration. I believe that if you want people to embrace your product, you have to make looks a first-class citizen. I think the developers who made the platform pictured below had the right idea.

There is a very functional reason for this: every thought you put into how things will appear translates into a better experience. The user may never have seen this environment before, but if you tap into that wealth of things they’re already familiar with, they’ll be able to use it much sooner. It reduces the learning curve. It makes understanding how the blocks all fit together take that much less time, by for instance, having all the arrows between boxes animate to show which way the information is flowing.
Make this easy enough, and you might tap into an audience of “casual programmers” that use this to assist them in their daily doings. No one’s come up with a successful programming analogue to the likes of Microsoft Access that appeals to the likes of secretaries and payroll officers. There’s room for one.
Conclusion
If you think any of these ideas are good, please steal them. Not that I should be credited for any of what I wrote here, given that there’s prior art in all instances.
Relevant Reading

